Smoothie Bowl

In Ramadan, we always try to do something special with our discovery boxes to celebrate the Holy Month. For those of you who are customers, we hope that you have been enjoying the extra nuts, seeds, and dried fruits! If you haven’t tried our discovery box yet, this is one of our favorite time of the year not only because of the extras, but also because stone fruit season has just started and that means lots of yummy fruits like cherries, plums, nectarines, and apricots.

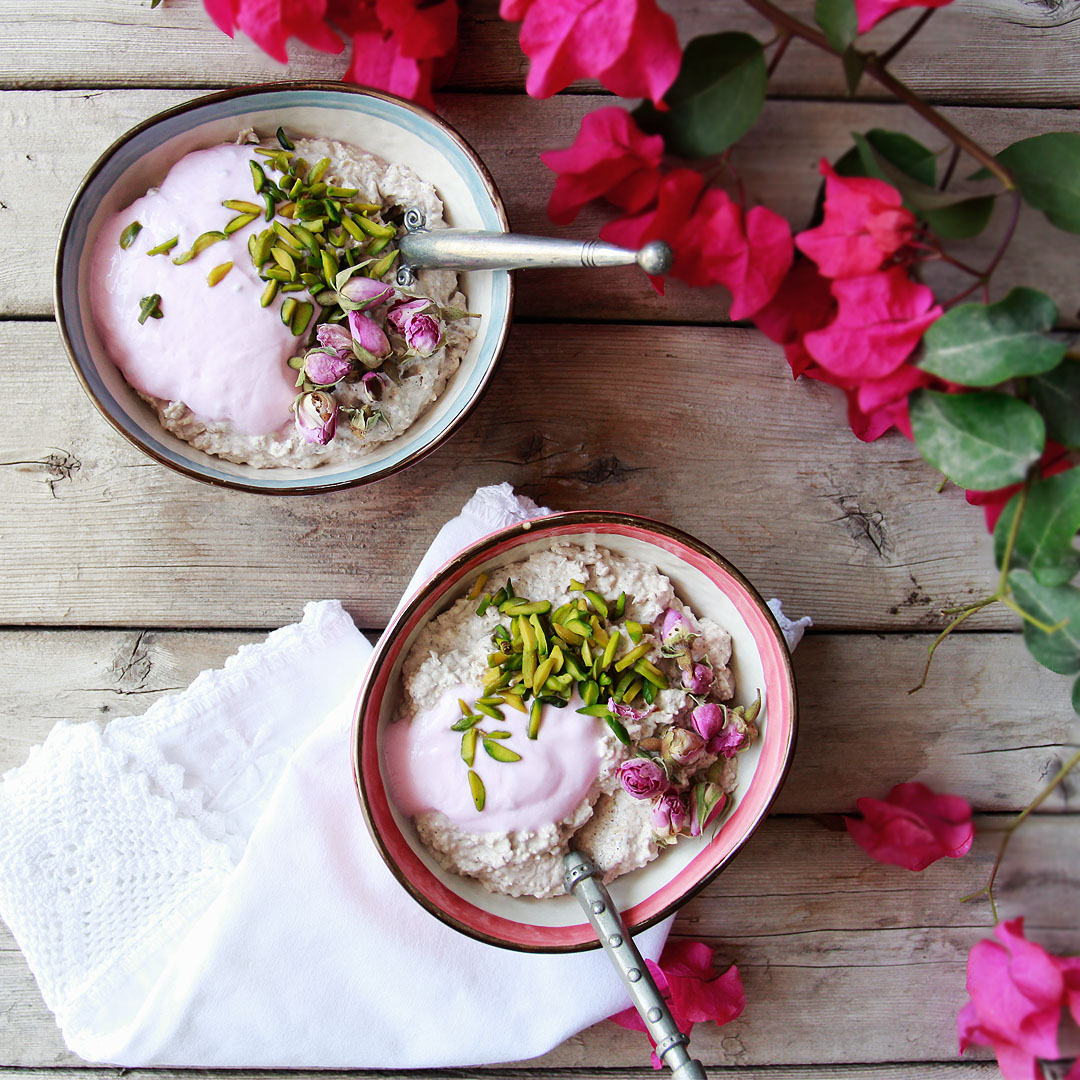
Today’s smoothie bowl recipe is perfect for Suhoor or even if you’re not fasting something to keep you going for a little longer.  In particular, coconut and cashews are both packed with healthy fats that help you feel satiated for longer. From your Fruitful Day box you can use your cherries, bananas, and pretty much any nuts and seeds in the box to craft these beautiful bowls of goodness.


Until next time and Ramadan Kareem!

Smoothie Bowl

(makes 2 large smoothie bowls)

5 – 10 minutes                                                         

INGREDIENTS

  • 2 frozen bananas from the Fruitful Day Box (this requires you to peel, chop and freeze the bananas the night before)
  • 1 cup frozen sour cherries
  • ¼ cup fresh coconut
  • 2 tbsp cacao powder
  • 2 tbsp cashews
  • ¾ cup coconut milk  

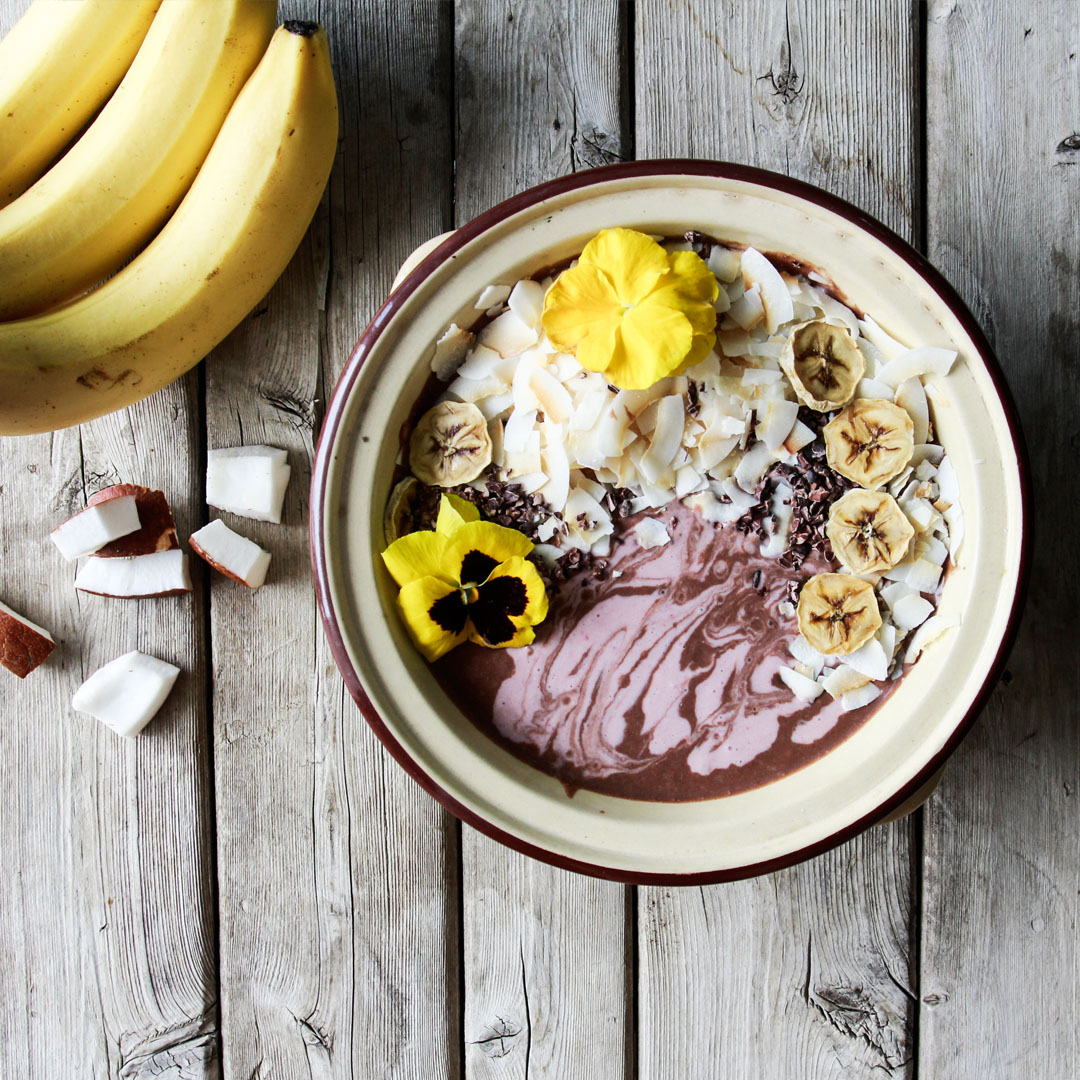
* optional toppings of cacao nibs, granola, berries, bee pollen, edible flowers, coconut chips

From the Fruitful Day Box: dried banana chips, nuts, seeds and dried fruit.

METHOD

  1. Blend all ingredients and pour into a bowl.
  2. Add toppings

* To get the colour variant you see in the photo:

  1. Omit the cacao powder and blend. Pour a little out and set aside.
  2. Add the cacao powder and blend again.
  3. Pour dark smoothie mixture into a bowl and then use the pink smoothie mixture to create patterns on top.


Lemon & Grapefruit Curd

With Ramadan fast approaching, we are committed to sharing as many recipes with you as possible.  Whether you’re fasting or not, these recipes are easy to make ahead and fuel you for the day. Today’s recipe is a lemon and grapefruit curd, which is delicious on toast, hot cross buns, or even as a tart filing. Best of all, it is free of any refined sugar!

A word about grapefruit, admittedly it’s not the most popular fruit in our boxes, but it has so many health benefits it’s still important for us to include! To begin with, a grapefruit contains the average adult’s full daily vitamin C requirement. Several studies have also shown numerous other benefits such is helping with weight loss, boosting immunity, and fighting cellulite. We’re pretty sure even if you’re not a grapefruit lover, you’ll love this curd as a healthy alternative to your usual jam.

Come back soon for our Ramadan recipes! One of our favorites is an apricot and orange granola bar free of sugar, corn syrup, wheat or canola oil. Next time you’re in the grocery store check the ingredient list of the granola bars on the shelf and you’ll realize just how much better is to make these on your own.

Lemon & Grapefruit Curd
(makes 1 cup curd)

Lemon & Grapefruit Curd

 20 minutes

INGREDIENTS

  • ¼ cup lemon juice from the Fruitful Day Box
  • ¼ cup grapefruit juice from the Fruitful Day Box
  • ½ cup honey
  • 3 egg yolks
  • 2 eggs
  • Pinch of salt
  • 6 tbsp ghee

METHOD

Lemon & Grapefruit Curd

  1. Place a small amount of water in a saucepan on medium heat. Let the water simmer but not boil.
  2. In a glass bowl mix the lemon juice, grapefruit juice, honey, egg yolks, eggs, salt and ghee. Whisk until combined.
  3. Place the bowl over the saucepan creating a bain-marie.
  4. Continuously stir the mixture until it reaches 76 degrees C. If you don’t have a thermometer just keep stirring until the mixture thickens. This will take up to 10 minutes. It may seem as though it will never thicken, however, at the point where the eggs are cooked it will suddenly thicken and this is when you’ll know it’s ready.
  5. Pour the mixture through a sieve to strain out any lumps and chill.
  6. This curd can be used on toast, hot cross buns, as a tart filling or poured over a vanilla cake.

Sweet Potato Slices with Lime Avocado and Goats Cheese

We can’t believe it’s May already! Ramadan is just around the corner and we’re still busy putting our final touches on our gifting range. Check out our Ramadan gift shop here and give the gift of health this holiday season!

When you’re busy, it’s always important to fuel yourself with the right food to keep you going. For that reason, we’ve decided to focus on an avocado based recipe this month. Avocados make a filling addition to any meal or snack providing both nutritious heart-healthy fats and about half your day’s fiber, folate, potassium, and Vitamin A*.

Move over avocado toast, we have an even healthier alternative for you! Sweet potato slices with lime avocado and goats cheese. We chose to add lime not only because it enhances the flavor, but also because the acidity stops the avocado browning from oxidation keeping it looking fresh for longer.

We hope you enjoy this afternoon snack and we’ll be sharing some Ramadan inspired recipes with you soon! Wishing you all a happy and productive May.

Sweet Potato Slices with lime avocado and goats cheese

Sweet Potato Slices with lime avocado and goats cheese

(makes 16 – 20 potato slices)

40 minutes

 INGREDIENTS

  • 1 large sweet potato (try to choose one that will cut into shapely sizes)
  • 1 tbsp ghee
  • 2 avocados from the Fruitful Day Box
  • 2 tbsp goats cheese
  • 1 lime from the Fruitful Day Box
  • Salt & pepper
  • Edible flowers, micro greens, spring onions and dried chilli flakes to garnish.

METHOD

Sweet Potato Slices with lime avocado and goats cheese

  1. Preheat the oven to 160 degrees C.
  2. Peel and slice the sweet potatoes into 1 cm slices.
  3. Coat with ghee, sprinkle with salt and pepper and roast for 20 minutes on a baking tray. Turn them after 10 minutes for even browning.
  4. While the potatoes are roasting, peel the avocado and put them a bowl with the lime juice, salt and pepper and smash into chunks.
  5. Once the potatoes are cooked, remove from the oven.
  6. Layer a spoon of avocado, crumbled cheese and then your garnishes of choice on each one.


*Source: Dr Axe, https://draxe.com/avocado-benefits/

Overnight Oats

We’ve been a little quiet on our blog as we’ve been busy preparing for Ramadan! We have been working on the most beautiful Ramadan platters that are the perfect hostess gift for Iftar or a healthy dessert option if you’re planning a function at your house. Take a little sneak peak of one of our platters here.

Anyway, with the beauty of the Holy Month around the corner, we were inspired to include a healthy breakfast influenced by the flavors of Ramadan on our blog. Overnight oats with pistachio, rosewater and pitaya stained yoghurt is literally one of the most beautiful recipes we’ve ever featured, but what makes it extra special is that it actually allows you to recycle the skins of your dragon fruit that you might otherwise throw away.

Still not convinced? Well did you know that rosewater actually has a number of health benefits? It can help keep you hydrated, which keeps your skin looking younger plus it’s said to have other anti-aging properties such as reducing wrinkles and tightening pours*. In addition, it’s known to be a mood booster. A recipe that helps you stay beautiful on the inside and the outside! You can’t beat that. 

Overnight Oats with pistachio, rosewater and pitaya stained yoghurt

(makes 2/3 portions)                

Overnight Oats with pistachio, rosewater and pitaya stained yoghurt                                                

30 minutes (not including soaking overnight)

INGREDIENTS

Overnight Oats with pistachio, rosewater and pitaya stained yoghurt

INGREDIENTS for the yoghurt

  • 1 450g tub yoghurt (full fat or dairy free)
  • 1 dragon fruit from the Fruitful Day Box

INGREDIENTS for the rosewater

  • ¼ cup dried rose petals (make sure they are organic and pesticide free)
  • 1 ½ cups water  

INGREDIENTS for the oats

  • 1/3 cup oats
  • 1 cup coconut milk
  • 2 tbsp raisins
  • ½ tsp cinnamon
  • ¼ tsp clove + cardamom + nutmeg
  • Pinch of salt
  • 1-2 tbsp honey or maple syrup (depending on how sweet you want it)
  • 3 tbsp thinly sliced pistachio
  • 1 tbsp rosewater

METHOD for the yoghurt

  1. Wash and peel the skin off the dragon fruit. Eat the fruit or use for smoothies or salads.
  2. Place the skin in a bowl with the yoghurt and mix it around.
  3. Leave overnight to allow the skin time to stain the yoghurt. Stir once or twice while soaking.

METHOD for the rosewater

  1. Place the rose petals and the water in a saucepan and simmer for 10 – 15 minutes or until the colour has faded from the petals. Some water will evaporate so you can add more if the flavour is too intense.
  2. Set aside in the fridge.

METHOD for the oats

  1. Place all ingredients except pistachio and rosewater in a bowl. Allow to soak overnight.
  2. In the morning you may need to add more coconut milk depending on how thick the milk is and what type of oats were used.
  3. Stir in the rosewater.
  4. Garnish with the stained yoghurt and pistachios.


*Source: 7 seasons to drink rose water, https://www.mnn.com/health/fitness-well-being/stories/7-reasons-drink-rose-water

Birthday Blueberry Cheesecake

It was our 3rd birthday yesterday so we wanted to celebrate with a blueberry cheesecake recipe to end the week!  Don’t worry though, we haven’t gone too crazy, this cake recipe is a vegan, refined sugar and gluten free recipe.  If you skip roasting the cashews, it’s even raw too.

We’re still a young business, but we’ve already learned so much in our 3 years.  When we started the business, it was only going to be a Corporate fruit box delivery service, but it’s turned into so much more. We’ve expanded into homes, gifting, and even events!  Along side the business growth, we’ve also added 3 beautiful children to the Fruitful Day family. We still have a long way to go, but we know that with such amazing customers and supporters by our side, this is just the beginning of a fruitful journey.  A big THANK YOU to each and every one of you who has been there for us along the way.

Now back to our recipe… blueberry cheesecake!  We just want to quickly mention some of the health benefits of blueberries as they’re always a favorite in our discovery box. As one of the most nutritious, antioxidant-rich types of fruit in the world, here are 7 reasons to include more blueberries more in your diet*:

  1. High In Antioxidants
  2. Helps Fight Cancers
  3. Amps Up Weight Loss
  4. Boost Brain Health
  5. Alleviates Inflammation
  6. Supports Digestion
  7. Promotes Heart Health


So now you can have your cake and eat it too GUILT-FREE.

Blueberry Cheesecake

Birthday Blueberry Cheesecake

(makes one square or round cake of 20cm)

30 minutes (not including soaking and setting time)

INGREDIENTS for the crust

  • 1 cup cashews
  • ¾ cup dates
  • ¾ cup cacao powder
  • pinch of salt
  • 1 tsp coconut oil

INGREDIENTS for the filling

  • 2 cups cashew
  • 6 tbsp coconut oil (melted)
  • 6 tbsp cacao butter (melted)
  • 8 tbsp coconut cream
  • 2 cups blueberries from the Fruitful Day Box
  • 6 tbsp maple syrup

METHOD

Birthday Blueberry Cheesecake

  1. Soak filling cashews in water for at least 4 hours or overnight.
  2. Roast crust cashews for 8 minutes at 160 degrees on a baking tray. (You can omit this step for a totally raw cake, however, it does add great flavor to the crust.)
  3. Blend all the dry crust ingredients in a food processor.
  4. Add the dates and coconut oil and blend until a dough forms.
  5. Line your cake dish and press the crust mixture into the base evenly.Blend all filling ingredients except for a handful of blueberries which you can use as blueberry chunks in the filling. Pour the filling over the crust, sprinkle the extra blueberries over the top, stir them in and then smoothen the top with a spatula. (For a white and blue layer – blend all filling ingredients except the blueberries. Pour half this mixture over the crust and smooth out evenly with a spatula. Add the blueberries to the remaining half of the mixture and blend. Pour this mixture over the white layer and smoothen out with a spatula.)
  6. Set in the freezer for 4 hours or in the fridge overnight.


*Source: Dr Axe, Top 7 Health Benefits of Blueberries

Orange Chocolate Easter Eggs

One of the beautiful things about living in Dubai is that you’re surrounded by people from all over the world each celebrating different holidays and traditions. For some of us, this weekend is special because it is the celebration of Easter!

We are all about balance at Fruitful Day and that means indulging every once and a while especially when it’s a special occasion.  With this is mind, we selected an Easter-themed Orange Chocolate Egg recipe for today! The egg is a traditional symbol of new life and rebirth.

As we get ready to start the spring season, whether you’re celebrating Easter or not, this season is known as a time for rejuvenation and renewal. Take 10 minutes today and set your intentions for the month. The goal is not perfection, but rather to look for small ways you can grow and improve yourself.

Orange Chocolate Easter Egg (makes one 14cm egg or a few smaller ones)

1 hour including chilling time

 INGREDEINTS

  • 2 x 100g bars of dark chocolate
  • Zest I orange
  • 3 squares of white chocolate
  • 1 tsp turmeric

INGREDEINTS

  • 1 saucepan
  • 1 glass bowl that will fit on the saucepan
  • Spatula
  • Zester
  • Knife
  • Chopping board
  • Small paint brush
  • Egg moulds of desired size

METHOD

The first thing to do when preparing any chocolate for egg making or dipping is to temper it. Tempering ensures the smooth glossy finish you see on chocolate and the sharp snap it has when you bit into it. The white discolouring or ‘bloom’ you see on some chocolate is a result of the cocoa butter separating when the chocolate is not properly tempered. To avoid this, the chocolate needs to go through a heating and cooling process that allows the fat crystals to seize at the correct size and create the desirable finish.

There are a few different methods to achieve this and some can be quite complex. Here is one quite simple ‘seeding’ method that requires only basic equipment and doesn’t require a thermometer.

  1. Roughly cut your dark chocolate up into pieces.
  2. Place a small saucepan of water on medium heat and place a bowl over the saucepan. This acts as a bain-marie. The water should be gently simmering but not boiling.
  3. Put 2/3 of the chocolate into the bowl and let it melt. Once it’s 80% melted add the orange zest and stir.
  4. Remove from the heat and place on a cloth. Make sure none of the water gets into the chocolate or it will sieze.
  5. Add the remaining 1/3 of the chocolate to the bowl and stir until melted. At this point the chocolate should feel as though it’s slightly below body temperature.
  6. Pour the chocolate into your egg mould and swirl it around until it’s evenly coated. Leave a small amount of chocolate in the bowl to glue the halves together later.
  7. Repeat this with both halves of the egg.
  8. Place in the freezer to harden for 10 minutes.
  9. If your chocolate has hardened by the time the egg halves are ready then place it over the hot water for a few seconds to soften it up.
  10. Remove the egg halves from the egg mould and shave uneven edges with a knife.
  11. Paint the edges of the egg halves with melted chocolate and then glue the two halves together. Place in the freezer to set.
  12. Repeat steps 1, 2 and 3 with the white chocolate, adding 1 tsp of turmeric for colour.
  13. Remove the whole egg from the chiller and splatter or paint the egg with the orange/yellow chocolate. Place in the freezer to set one more time.

Immunity March: Strawberry, Basil, Lime & Coconut Water Popsicles

This month has flown by and we hope everyone is enjoying some well-deserved rest over spring break. We have the kids home for a few weeks so we thought it was fitting to include a popsicle recipe that is perfect to make and enjoy with the family! This is our last recipe for month focusing on immunity.

Not only are these strawberry, basil, lime and coconut water popsicles beautiful, the coconut water contains lauric acid, which is anti-fungal, anti-bacterial and anti-viral. This makes it a great immune system booster that can help us fight infection!

We have some delicious recipes coming next month including a special Easter treat. Stay tuned for more details coming soon!

Strawberry, Basil, Lime & Coconut Water Popsicles (makes approx. 8)

15 minutes

INGREDIENTS

Strawberry, Basil, Lime & Coconut Water Popsicles

  • 10 strawberries from the Fruitful Day Box
  • 16 basil leaves
  • Juice of 2 limes
  • ½ cup coconut water from the Fruitful Day Box
  • Option to sweeten with honey or maple, however, usually the strawberries are sweet enough!

METHOD

Strawberry, Basil, Lime & Coconut Water Popsicles

  1. Blend all ingredients and pour into the popsicle moulds and freeze for several hours.

If you want your popsicles to look like the ones in the photograph:

  1. Pour only a little of the strawberry liquid into the popsicle mould and let it set in the freezer for several hours.
  2. Pour coconut water in to fill the mould and add a basil leaf for colour. Freeze again for several hours and then remove.


Immunity March: Banana Pancakes

Between Happiness Day, Mother’s Day, and end of term, it’s been another busy week here at Fruitful Day HQ! We’re looking forward to spending some extra time with the kids over the next couple of weeks and if we’re perfectly honest getting some extra hours of sleep too. These down periods are hugely important to building our immunity as we give our bodies a change to rest and recharge.

Our banana pancake recipe today is the perfect breakfast for after you’ve gotten your 7-8 hours of sleep!. It is simple, healthy and fun to make with the kids.

Generally speaking pancakes aren’t thought to be a ‘healthy’ breakfast, but by substituting a few key ingredients they are actually good for you without comprising on taste. In this recipe, both flour and milk have been substituted, which are inflammatory and the opposite of immune boosting. In addition, these pancakes include bananas, which are full of nutrients help to support the immune function like iron, zinc, Vitamin A, Vitamin B6, Vitamin C and selenium.

Enjoy your holidays and remember PREVENTION is the key to not getting sick so rest up, eat well, stay hydrated and take time to do things that make you HAPPY.

Banana Pancakes (makes 15 palm sized pancakes)

45 – 50 minutes (If you have a larger pan and can cook several at once it will be faster)  

INGREDIENTS

Immunity March: Banana Pancakes

  • 3 bananas
  • 4 eggs
  • 3 tbsp peanut butter
  • ¾ cup oats
  • 1 tsp baking powder
  • 2 tbsp cinnamon

 METHOD

Immunity March: Banana Pancakes

  1. Put two non stick pans on medium heat.
  2. Blend all ingredients into a batter.
  3. Add 1 tsp ghee into each pan and pour batter until it spreads out into a palm sized shape in the pan. Note – these pancakes will not hold together like regular flour pancakes so if you make them too big they will break up.
  4. Flip pancake once cooked and cook on the other side.
  5. Continue until all the batter is used.
  6. Serve with yoghurt, coconut cream, fruit, honey, maple, cacao nibs or any topping of choice.


Immunity March: Fish Tacos with Pineapple Slaw

What a week last week! We finally launched delivery to Abu Dhabi and were honored to be a supporting partner for the 5th annual WOMEN ACHIEVE Symposium hosted by the AmCham Abu Dhabi.  You can read more about the event here. One of the distinguished speakers, Honorable Barbara A. Leaf, US Ambassador to the United Arab Emirates, was such a pleasure to listen to. She spoke about how her key to living a happy life was being confident, curious, and authentic. As a women-led business, we’re not always the best at being confident, but she  simply said “fake it until you feel it”, “fake it until you believe it”, and “fake it until you make it”. We left the event inspired about what we can achieve in Abu Dhabi and just a little bit more confident that we will make it!

Now you’re probably wondering what does all of this have to do with a fish taco recipe… well we had someone tell us last week they loved the look of our recipes, but weren’t sure they could actually make them! We always select our recipes based on seasonal fruits, nuts, and dried fruits available in our boxes and add ingredients that help you to take care of yourself and your health. This month it’s about boosting your immunity, which is why we’ve selected a pineapple recipe, a single serving of which contains 130% of your daily Vitamin C.

This week we encourage you to pick just one recipe from our blog and “fake it until you make it”, we promise your health will thank you!

Fish Tacos with Pineapple Slaw (serves 2)

40 – 50 minutes (not including marination time)

Immunity March: Fish Tacos with Pineapple Slaw

INGREDIENTS

  • 6 soft shell corn tacos

For the slaw

  • One handful thinly sliced red cabbage
  • One diced tomato
  • Pineapple from the Fruitful Day Box
  • One sliced red onion
  • Juice 1 lime
  • One handful chopped coriander
  • Salt & pepper

For the fish

  • Two fillets of white fish (sea bass, sea bream, tilapia)
  • 1 tsp chilli powder
  • 1 tsp cumin powder
  • 1 tsp garlic powder
  • 1 tsp onion powder
  • 1 tsp paprika
  • 3 tbsp lime juice
  • 3 tbsp olive oil

For the avocado pure 

  • One Avocado
  • Juice of 3 limes
  • 1 tsp cumin
  • Pinch of salt 

For the garnish

  • One thinly sliced radish
  • One handful coriander leaves
  • Sour cream

METHOD

Immunity March: Fish Tacos with Pineapple Slaw

For the slaw

  1. Combine thinly sliced cabbage, diced cucumber, lime juice, coriander, salt and pepper in a bowl.
  2. Grill pineapple and red onion on a griddle until scorched and softened. (Option to omit this step but it adds flavour and also makes the onion less strong).
  3. Once cooled, add pineapple and onion to the rest of the slaw mixture.

For the fish  

  1. Combine all spices, oil and lime juice and then rub over the fish fillets. Marinate for 30 – 60 minutes.
  2. Heat a pan on medium heat, add 1 tbsp ghee and cook the fish. It should take 3 – 5 minutes per side to be nicely browned.
  3. Remove from the pan and break into pieces for each taco.

For the avocado puree

  1. Blend avocado with lime juice, cumin and salt until smooth.

To assemble

  1. Layer the fish and slaw onto a taco shell.
  2. Garnish with the radish, coriander leaves and sour cream.
  3. Add avocado puree.

Immunity March: Gooseberry & Mango Crumble

We hope everyone is having a good week. It’s been hectic on our side as we have something special to announce this Thursday that we’ve been working hard on! When you’re busy running around, it’s often easy to forget to take care of yourself, but it’s so important to make sure you don’t get run down and sick. Eating the right foods can help you build up your IMMUNITY, which is our focus for the month of March.

Today’s recipe is a gooseberry and mango crumble, which we have selected this month because of the immunity boosting qualities of gooseberries. Gooseberries actually have more Vitamin C than lemons, which helps to boost your immunity and clear your skin. In addition, they are full of Vitamin A, which is known to improve eyesight and of course immunity too. They are also known for their anti-oxidant qualities, which are unique compared to other berries because of their yellow-orange color.

If you’ve never had a gooseberry and wondering what to expect, think about Sour Patch Kids, but the healthy version of course! We’re so excited about this recipe, we may bake one on Thursday to celebrate our announcement!

Gooseberry & Mango Crumble (makes one 25cm shallow crumble)  

30 – 40 minutes

INGREDIENTS

Immunity March: Gooseberry & Mango Crumble

 For the fruit mixture

  • 1 mango (approx. 560g) from the Fruitful Day Box
  • 100g gooseberries from the Fruitful Day Box
  • 20g coconut sugar
  • Juice 1 lime
  • 1 tsp cinnamon

 For the crumble  

  •  50g gluten free flour
  • 100g almond flour
  • 40g coconut flour
  • 80g roughly chopped almonds
  • 30g coconut sugar
  • 125g grass fed butter
  • 2 tsp cinnamon
  • 2tsp ginger powder
  • Pinch of salt

METHOD

Immunity March: Gooseberry & Mango Crumble

  1. Preheat oven to 160 degrees C.
  2. Cube the mango, cut the tops off the gooseberries and cut them in half.
  3. Place fruits in a bowl along with the coconut sugar, lime, salt and cinnamon. Mix well and then scoop into the baking dish.
  4. Bake the fruit mixture on it’s own for 10 minutes. This ensures a very caramelised flavour.
  5. While the fruit is baking, mix all flours together in a bowl along with the chopped almonds, coconut sugar, cinnamon, ginger and salt.
  6. Cube the butter and then rub it into the flour and spice mixture. The mixture should begin to be crumbly, however, you don’t want the crumbs to be too small as they will burn in the oven.
  7. Remove the fruit mixture from the oven and sprinkle the crumble mixture over it evenly.
  8. Return to the oven and bake for 10 – 12 minutes or until browned on top.
  9. Serve with yoghurt or cream.