Dehydrated Apples with Dark Chocolate and Sea Salt

Football fever is everywhere and there’s definitely some competition in our office! How about yours?

As much fun as 3 football games a day are, it also inevitably means A LOT of snacking. That’s why we thought that for today’s recipe we would encourage you to stay on your top game with a great healthy snack alternative that is both sweet and savory.

Roll on dehydrated apples with dark chocolate and sea salt! They’re as easy to grab and snack on as chips, but without all the nasties added. Now back to football… we all know Germany is going to win, right?! Only comment if you agree… we’re kidding mostly! Continue reading Dehydrated Apples with Dark Chocolate and Sea Salt

Peach & Nectarine Cobbler

Just like that it’s almost the end of Ramadan already. Where has the time gone?! Despite the heat, we have very much enjoyed the Holy Month. It is always a beautiful time of year to meet friends and be introduced to new and inspiring people. As we head into the summer, we have some exciting plans as always.  Watch this space!

In the meantime our Eid gift to you is a delicious gluten and sugar free cobbler recipe. Don’t worry – it’s not difficult and it doesn’t matter if it’s not perfect when you make it. It’s an impressive dessert that is still light and simple. Bring it with you this weekend to wherever you are heading and gather around and enjoy the holidays!
Eid Mubarak from us at Fruitful Day. 

Peach & Nectarine Cobbler (makes one 25cm round dish cobbler)

(Serves 4)                                     

45 minutes

INGREDIENTS for the filling

  • 3 peaches from the Fruitful Day Box
  • 3 nectarines from the Fruitful Day Box
  • Juice of half a lemon
  • 1 tsp cinnamon
  • ¼ tsp nutmeg

INGREDIENTS for the crust

  • ½ cup of coconut flour
  • ½ cup of gluten free flour 
  • 1 tsp cinnamon
  • 1 tsp baking powder
  • ¼ tsp salt
  • 3 tbsp grass fed butter
  • 3 tbsp honey
  • 1 egg

METHOD

Peach & Nectarine Cobbler

METHOD for the filling

  1. Slice all the nectarines and peaches into 5mm slithers.
  2. In a large bowl, toss the sliced nectarines and peaches in the lemon juice and spices.
  3. Arrange the fruit in your baking dish – in a smaller dish, the slices may layer on top of one another.

METHOD for the crust

  1. Preheat the oven to 160 °C
  2. Melt butter and set aside.
  3. Mix together all dry ingredients: flours, cinnamon, baking powder and salt.
  4. Whisk the egg in a bowl and set a small splash aside for the egg wash later.
  5. Add wet ingredients: butter, honey and the rest of the egg.
  6. Combine ingredients and bring together to form a dough.
  7. Lightly flour a clean, flat surface and roll the dough out to 3-4mm thickness.
  8. Using cookie cutters, cut out the desired shape. Place this cut out shape on top of the layered peaches and nectarines.
  9. Continue until all the dough is used – there may be some left over depending on the size of the dish.
  10. Using a brush or your finger, paint the dough cut outs with a layer of egg wash.
  11. Place in the oven and bake for 25 – 30 minutes or until dough is browned and the peaches are caramelised.
  12. Serve hot or cold with yoghurt or ice cream. 


Lemon & Grapefruit Curd

With Ramadan fast approaching, we are committed to sharing as many recipes with you as possible.  Whether you’re fasting or not, these recipes are easy to make ahead and fuel you for the day. Today’s recipe is a lemon and grapefruit curd, which is delicious on toast, hot cross buns, or even as a tart filing. Best of all, it is free of any refined sugar!

A word about grapefruit, admittedly it’s not the most popular fruit in our boxes, but it has so many health benefits it’s still important for us to include! To begin with, a grapefruit contains the average adult’s full daily vitamin C requirement. Several studies have also shown numerous other benefits such is helping with weight loss, boosting immunity, and fighting cellulite. We’re pretty sure even if you’re not a grapefruit lover, you’ll love this curd as a healthy alternative to your usual jam.

Come back soon for our Ramadan recipes! One of our favorites is an apricot and orange granola bar free of sugar, corn syrup, wheat or canola oil. Next time you’re in the grocery store check the ingredient list of the granola bars on the shelf and you’ll realize just how much better is to make these on your own.

Lemon & Grapefruit Curd
(makes 1 cup curd)

Lemon & Grapefruit Curd

 20 minutes

INGREDIENTS

  • ¼ cup lemon juice from the Fruitful Day Box
  • ¼ cup grapefruit juice from the Fruitful Day Box
  • ½ cup honey
  • 3 egg yolks
  • 2 eggs
  • Pinch of salt
  • 6 tbsp ghee

METHOD

Lemon & Grapefruit Curd

  1. Place a small amount of water in a saucepan on medium heat. Let the water simmer but not boil.
  2. In a glass bowl mix the lemon juice, grapefruit juice, honey, egg yolks, eggs, salt and ghee. Whisk until combined.
  3. Place the bowl over the saucepan creating a bain-marie.
  4. Continuously stir the mixture until it reaches 76 degrees C. If you don’t have a thermometer just keep stirring until the mixture thickens. This will take up to 10 minutes. It may seem as though it will never thicken, however, at the point where the eggs are cooked it will suddenly thicken and this is when you’ll know it’s ready.
  5. Pour the mixture through a sieve to strain out any lumps and chill.
  6. This curd can be used on toast, hot cross buns, as a tart filling or poured over a vanilla cake.

Birthday Blueberry Cheesecake

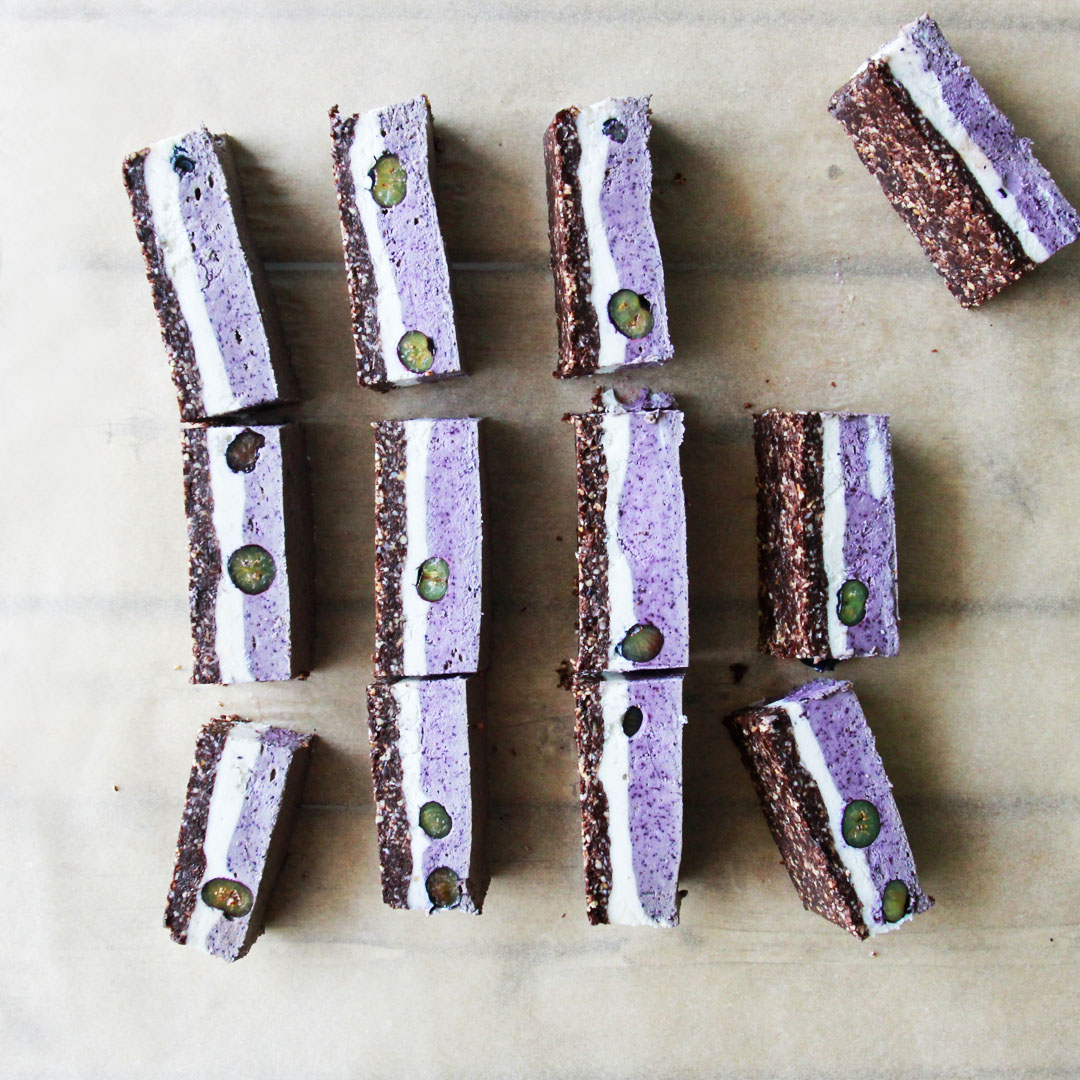
It was our 3rd birthday yesterday so we wanted to celebrate with a blueberry cheesecake recipe to end the week!  Don’t worry though, we haven’t gone too crazy, this cake recipe is a vegan, refined sugar and gluten free recipe.  If you skip roasting the cashews, it’s even raw too.

We’re still a young business, but we’ve already learned so much in our 3 years.  When we started the business, it was only going to be a Corporate fruit box delivery service, but it’s turned into so much more. We’ve expanded into homes, gifting, and even events!  Along side the business growth, we’ve also added 3 beautiful children to the Fruitful Day family. We still have a long way to go, but we know that with such amazing customers and supporters by our side, this is just the beginning of a fruitful journey.  A big THANK YOU to each and every one of you who has been there for us along the way.

Now back to our recipe… blueberry cheesecake!  We just want to quickly mention some of the health benefits of blueberries as they’re always a favorite in our discovery box. As one of the most nutritious, antioxidant-rich types of fruit in the world, here are 7 reasons to include more blueberries more in your diet*:

  1. High In Antioxidants
  2. Helps Fight Cancers
  3. Amps Up Weight Loss
  4. Boost Brain Health
  5. Alleviates Inflammation
  6. Supports Digestion
  7. Promotes Heart Health


So now you can have your cake and eat it too GUILT-FREE.

Blueberry Cheesecake

Birthday Blueberry Cheesecake

(makes one square or round cake of 20cm)

30 minutes (not including soaking and setting time)

INGREDIENTS for the crust

  • 1 cup cashews
  • ¾ cup dates
  • ¾ cup cacao powder
  • pinch of salt
  • 1 tsp coconut oil

INGREDIENTS for the filling

  • 2 cups cashew
  • 6 tbsp coconut oil (melted)
  • 6 tbsp cacao butter (melted)
  • 8 tbsp coconut cream
  • 2 cups blueberries from the Fruitful Day Box
  • 6 tbsp maple syrup

METHOD

Birthday Blueberry Cheesecake

  1. Soak filling cashews in water for at least 4 hours or overnight.
  2. Roast crust cashews for 8 minutes at 160 degrees on a baking tray. (You can omit this step for a totally raw cake, however, it does add great flavor to the crust.)
  3. Blend all the dry crust ingredients in a food processor.
  4. Add the dates and coconut oil and blend until a dough forms.
  5. Line your cake dish and press the crust mixture into the base evenly.Blend all filling ingredients except for a handful of blueberries which you can use as blueberry chunks in the filling. Pour the filling over the crust, sprinkle the extra blueberries over the top, stir them in and then smoothen the top with a spatula. (For a white and blue layer – blend all filling ingredients except the blueberries. Pour half this mixture over the crust and smooth out evenly with a spatula. Add the blueberries to the remaining half of the mixture and blend. Pour this mixture over the white layer and smoothen out with a spatula.)
  6. Set in the freezer for 4 hours or in the fridge overnight.


*Source: Dr Axe, Top 7 Health Benefits of Blueberries

Orange Chocolate Easter Eggs

One of the beautiful things about living in Dubai is that you’re surrounded by people from all over the world each celebrating different holidays and traditions. For some of us, this weekend is special because it is the celebration of Easter!

We are all about balance at Fruitful Day and that means indulging every once and a while especially when it’s a special occasion.  With this is mind, we selected an Easter-themed Orange Chocolate Egg recipe for today! The egg is a traditional symbol of new life and rebirth.

As we get ready to start the spring season, whether you’re celebrating Easter or not, this season is known as a time for rejuvenation and renewal. Take 10 minutes today and set your intentions for the month. The goal is not perfection, but rather to look for small ways you can grow and improve yourself.

Orange Chocolate Easter Egg (makes one 14cm egg or a few smaller ones)

1 hour including chilling time

 INGREDEINTS

  • 2 x 100g bars of dark chocolate
  • Zest I orange
  • 3 squares of white chocolate
  • 1 tsp turmeric

INGREDEINTS

  • 1 saucepan
  • 1 glass bowl that will fit on the saucepan
  • Spatula
  • Zester
  • Knife
  • Chopping board
  • Small paint brush
  • Egg moulds of desired size

METHOD

The first thing to do when preparing any chocolate for egg making or dipping is to temper it. Tempering ensures the smooth glossy finish you see on chocolate and the sharp snap it has when you bit into it. The white discolouring or ‘bloom’ you see on some chocolate is a result of the cocoa butter separating when the chocolate is not properly tempered. To avoid this, the chocolate needs to go through a heating and cooling process that allows the fat crystals to seize at the correct size and create the desirable finish.

There are a few different methods to achieve this and some can be quite complex. Here is one quite simple ‘seeding’ method that requires only basic equipment and doesn’t require a thermometer.

  1. Roughly cut your dark chocolate up into pieces.
  2. Place a small saucepan of water on medium heat and place a bowl over the saucepan. This acts as a bain-marie. The water should be gently simmering but not boiling.
  3. Put 2/3 of the chocolate into the bowl and let it melt. Once it’s 80% melted add the orange zest and stir.
  4. Remove from the heat and place on a cloth. Make sure none of the water gets into the chocolate or it will sieze.
  5. Add the remaining 1/3 of the chocolate to the bowl and stir until melted. At this point the chocolate should feel as though it’s slightly below body temperature.
  6. Pour the chocolate into your egg mould and swirl it around until it’s evenly coated. Leave a small amount of chocolate in the bowl to glue the halves together later.
  7. Repeat this with both halves of the egg.
  8. Place in the freezer to harden for 10 minutes.
  9. If your chocolate has hardened by the time the egg halves are ready then place it over the hot water for a few seconds to soften it up.
  10. Remove the egg halves from the egg mould and shave uneven edges with a knife.
  11. Paint the edges of the egg halves with melted chocolate and then glue the two halves together. Place in the freezer to set.
  12. Repeat steps 1, 2 and 3 with the white chocolate, adding 1 tsp of turmeric for colour.
  13. Remove the whole egg from the chiller and splatter or paint the egg with the orange/yellow chocolate. Place in the freezer to set one more time.

Immunity March: Strawberry, Basil, Lime & Coconut Water Popsicles

This month has flown by and we hope everyone is enjoying some well-deserved rest over spring break. We have the kids home for a few weeks so we thought it was fitting to include a popsicle recipe that is perfect to make and enjoy with the family! This is our last recipe for month focusing on immunity.

Not only are these strawberry, basil, lime and coconut water popsicles beautiful, the coconut water contains lauric acid, which is anti-fungal, anti-bacterial and anti-viral. This makes it a great immune system booster that can help us fight infection!

We have some delicious recipes coming next month including a special Easter treat. Stay tuned for more details coming soon!

Strawberry, Basil, Lime & Coconut Water Popsicles (makes approx. 8)

15 minutes

INGREDIENTS

Strawberry, Basil, Lime & Coconut Water Popsicles

  • 10 strawberries from the Fruitful Day Box
  • 16 basil leaves
  • Juice of 2 limes
  • ½ cup coconut water from the Fruitful Day Box
  • Option to sweeten with honey or maple, however, usually the strawberries are sweet enough!

METHOD

Strawberry, Basil, Lime & Coconut Water Popsicles

  1. Blend all ingredients and pour into the popsicle moulds and freeze for several hours.

If you want your popsicles to look like the ones in the photograph:

  1. Pour only a little of the strawberry liquid into the popsicle mould and let it set in the freezer for several hours.
  2. Pour coconut water in to fill the mould and add a basil leaf for colour. Freeze again for several hours and then remove.


Immunity March: Gooseberry & Mango Crumble

We hope everyone is having a good week. It’s been hectic on our side as we have something special to announce this Thursday that we’ve been working hard on! When you’re busy running around, it’s often easy to forget to take care of yourself, but it’s so important to make sure you don’t get run down and sick. Eating the right foods can help you build up your IMMUNITY, which is our focus for the month of March.

Today’s recipe is a gooseberry and mango crumble, which we have selected this month because of the immunity boosting qualities of gooseberries. Gooseberries actually have more Vitamin C than lemons, which helps to boost your immunity and clear your skin. In addition, they are full of Vitamin A, which is known to improve eyesight and of course immunity too. They are also known for their anti-oxidant qualities, which are unique compared to other berries because of their yellow-orange color.

If you’ve never had a gooseberry and wondering what to expect, think about Sour Patch Kids, but the healthy version of course! We’re so excited about this recipe, we may bake one on Thursday to celebrate our announcement!

Gooseberry & Mango Crumble (makes one 25cm shallow crumble)  

30 – 40 minutes

INGREDIENTS

Immunity March: Gooseberry & Mango Crumble

 For the fruit mixture

  • 1 mango (approx. 560g) from the Fruitful Day Box
  • 100g gooseberries from the Fruitful Day Box
  • 20g coconut sugar
  • Juice 1 lime
  • 1 tsp cinnamon

 For the crumble  

  •  50g gluten free flour
  • 100g almond flour
  • 40g coconut flour
  • 80g roughly chopped almonds
  • 30g coconut sugar
  • 125g grass fed butter
  • 2 tsp cinnamon
  • 2tsp ginger powder
  • Pinch of salt

METHOD

Immunity March: Gooseberry & Mango Crumble

  1. Preheat oven to 160 degrees C.
  2. Cube the mango, cut the tops off the gooseberries and cut them in half.
  3. Place fruits in a bowl along with the coconut sugar, lime, salt and cinnamon. Mix well and then scoop into the baking dish.
  4. Bake the fruit mixture on it’s own for 10 minutes. This ensures a very caramelised flavour.
  5. While the fruit is baking, mix all flours together in a bowl along with the chopped almonds, coconut sugar, cinnamon, ginger and salt.
  6. Cube the butter and then rub it into the flour and spice mixture. The mixture should begin to be crumbly, however, you don’t want the crumbs to be too small as they will burn in the oven.
  7. Remove the fruit mixture from the oven and sprinkle the crumble mixture over it evenly.
  8. Return to the oven and bake for 10 – 12 minutes or until browned on top.
  9. Serve with yoghurt or cream.

Energy February: Upside-Down Orange Cake

If you’ve been following our blog this month, you’ll know we’ve been focusing on foods that can help you boost your energy levels. Choosing your ingredients carefully is the difference between the right kind of sugar, carbohydrates, and fats, which boost your energy levels and the wrong kind, which will leave you feeling tired and hungry a short time later.

Our last recipe of the month is an upside-down orange cake. Many people love to eat cake mid morning or mid afternoon as an energy boost when they are hitting a low. However, traditional cake made with flour and sugar is high glycemic which means it will spike your blood sugar levels quickly and sharply, however, make you feel tired and hungry later in the day. This cake made with almond flour and maple, is much lower on the glycemic index and will be sure to satisfy your sweet tooth without playing havoc with your blood sugar levels and appetite. 

If you’ve received blood oranges in your box this week, we recommend swapping out the oranges for blood oranges in the recipe for a stunning finish!

Upside-down Orange Cake (one 20cm cake)

INGREDEINTS

  • 3 tbsp coconut sugar
  • 3 tbsp grass fed butter 
  • 1/3 cup (65g) ghee/butter
  • 1 ¾ cups (175g) almond flour
  • ¼ cup (30g) arrowroot flour or any gluten free flour blend
  • ¼ tsp salt
  • 3 eggs
  • ½ cup (120ml) maple syrup/honey
  • 2 tsp vanilla powder/extract
  • 1 tsp lemon juice
  • ½ tsp baking soda
  • 2 Oranges from the fruitful day box

METHOD

Upside-down Orange Cake (one 20cm cake)

  1. Preheat oven to 165 degrees C. Grease or line a cake tin and set aside.
  2. Zest the oranges and then slice into 1cm slices. Cut the peel off each slice leaving a slither of the pith to hold the orange together.
  3. Heat the coconut sugar and butter in a pan on low heat until the sugar is melted. Pour this mixture into the bottom of the prepared cake tin and spread evenly.
  4. Arrange the orange slices over the butter and sugar mixture.
  5. In one bowl mix the almond flour, arrowroot, salt and baking soda.
  6. Separate the egg whites from the yolks and in another bowl mix the yolks, maple syrup, melted ghee, vanilla, lemon juice and orange zest.
  7. Beat the egg whites with a hand mixer or kitchen aid until they form soft peaks.
  8. Mix the egg yolk mixture into the flour mixture and then fold in the egg whites.
  9. Pour this cake mixture over the oranges in the cake tin.
  10. Bake for 30 – 40 minutes or until a skewer inserted comes out clean. Check the cake after 8 – 10 minutes and cover if it has began to brown. As soon as you see browning you need to cover for the remainder of the cooking time.

Energy February: Mint Chocolate Chip Nice Cream

Our Valentine’s gift to you is a recipe for mint chocolate chip nice cream! You’re probably thinking, how the heck can this be healthy?! Well this nice cream is made with bananas, which are a great source of essential vitamins and minerals, including potassium, magnesium, and fiber. They are a great food for working out as they contain quick-acting carbohydrates, which increase energy levels.  In addition, they have nutrients to help with muscle repair and balance water retention so can also be eaten post-workout. Yes, bananas do have sugar, but at the end of the day they are still a much better choice than traditional dairy and sugar filled ice creams. Besides, if you have kids you’ll know ice cream is the best way to ‘hide’ nutrients such as spirulina since they’ll be so distracted by those chocolate chips on top! We hope you’re enjoying this months recipes focused on ENERGY, in case you missed them we have also shared a passion fruit cheesecake and an apple compote & granola with yoghurt recipe.

Mint Chocolate Chip Nice Cream

INGREDIENTS

Mint Chocolate Chip Nice Cream

For the mint nice cream 

  • 2 frozen bananas
  • ½ cup coconut cream
  • ½ cup soaked cashews
  • 1/8 tsp mint extractt
  • 1 tbsp cacao nibs
  • ½ tsp spirulina powder
  • 1 tbsp cacao powder

 METHOD

Mint Chocolate Chip Nice Cream

  1. Blend all ingredients except the cacao nibs and cacao powder. You may need to add more coconut cream if the blade is not spinning and the mixture is too thick. However, don’t add too much as it will become too thin.
  2. Once blended pour half the mixture into a bowl.
  3. Add 1 tbsp cacao powder to the remaining mixture and blend.
  4. Layer the green mint and brown chocolate ice cream in a bowl or glass and top with the cacao nibs.


Energy February: Passion Fruit Cheesecake

Passion Fruit Cheesecake (makes 12 mini 6cm cakes or one large 20cm cake)

We’re continuing our focus on energy with a passion fruit cheesecake recipe, which uses dates in the base. Most of us know that dates are higher in sugar than many other fruits, however, they are high in natural, useful sugars like fructose, glucose, and sucrose.  These sugars are easily processed and utilized by the body for energy. So instead of reaching for a pre-packaged dessert, try to make this dessert from scratch and you’ll not only taste the difference, but feel the difference as well! 

INGREDIENTS

For the base

  • 1 cup almonds
  • ¾ cup dates
  • 1/3 cup cacao powder
  • ½ cup dessicated coconut
  • pinch of salt
  • 1 tbsp coconut oil

For the filling  

  • 2 cup soaked cashew 
  • 6 tbsp coconut oil
  • 6 tbsp cacao butter
  • 8 tbsp coconut cream
  • ¾ cup passion fruit
  • 6 tbsp maple syrup
  • ½ tsp vanilla

METHOD

  1. Soak cashews in water overnight or for at least 4 hours.
  2. Put dry base ingredients; almond, cacao powder, coconut and salt in a food processor and blend until the nuts are finely chopped.
  3. Add the dates to the processor and blend. If the mixture comes together well in your hand, then there is no need for coconut oil. This will depend on how dry the dates are; drier dates will call for more coconut oil.
  4. Press the base into the bottom of your moulds until it is ½ – 1cm thick.
  5. Drain and rinse cashews from their water and then blend all filling ingredients in a high speed blender until smooth.
  6. Pour filling over the base and allow to set in the freezer for 2 – 4 hours.

Garnish options:

  • fresh passion fruit
  • dehydrated passion fruit
  • nuts & seeds
  • edible flowers
  • Coconut cream – put a can of coconut cream in the fridge overnight. Open and scoop out the top half of the can which will be thick and separated from the water. Whip with a hand whisk or kitchen aid. It will now be thick enough to use as a garnish.