Paleo Strawberry Shortcake

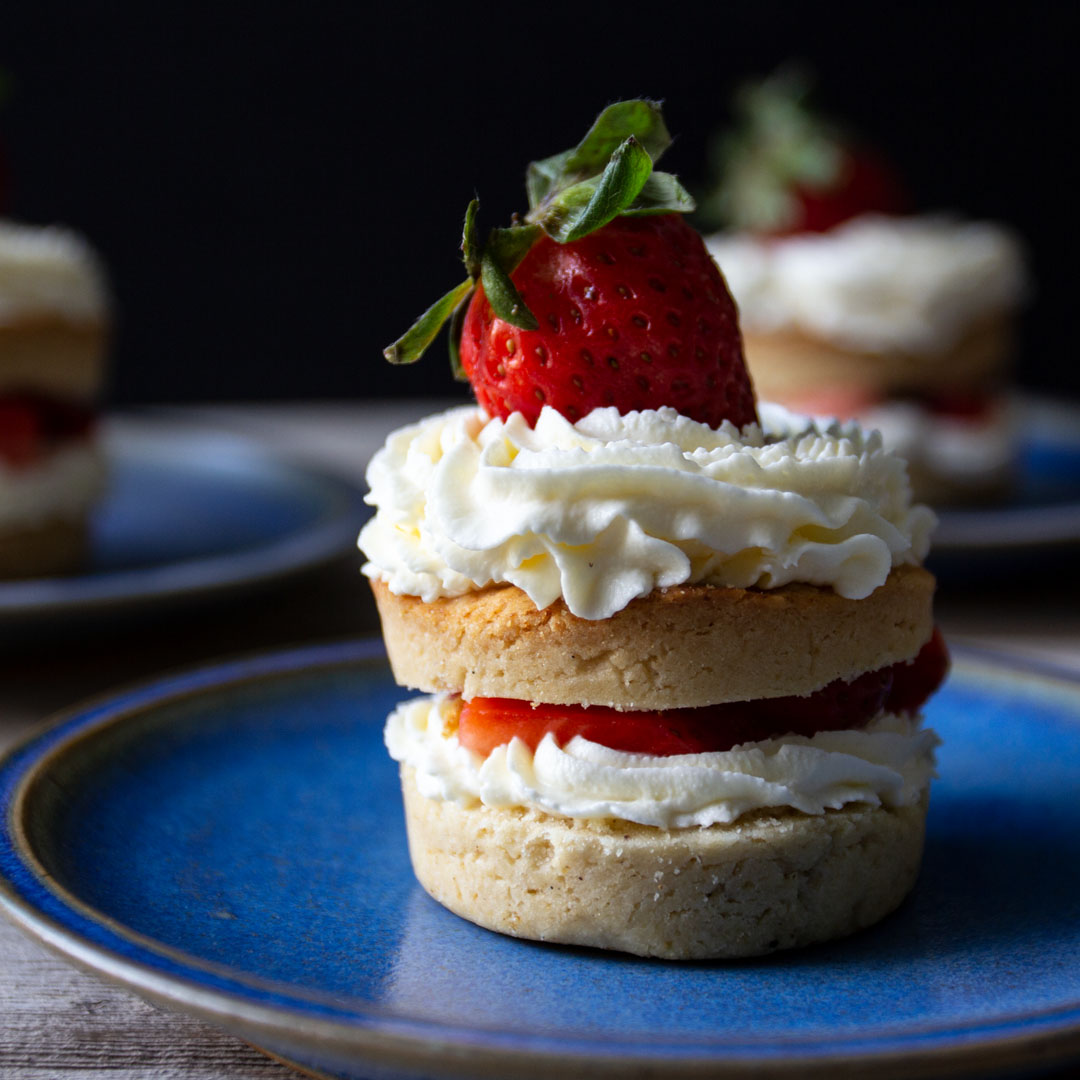
You’re going to love how easy this paleo strawberry shortcake is! With the use of almond flour, it allows you to indulge in a guilt-free dessert, and who doesn’t love that?!

Most gluten-free shortcakes recipes use ingredients that aren’t much better than wheat flour and white sugar. Our shortcake recipe uses more nutrient-dense ingredients such as almond flour. Almond flour is free of gut-irritating thickeners which include xanthan gum, corn starch and refined sugar. In this recipe, we substituted milk with coconut milk. However, we kept the butter because fat from grass-fed cow butter is full of beneficial fatty acids.

Once baked, the shortcakes go nicely with jam, yoghurt or ice cream. But, if you’re not a big fan of sweetness, you can always decrease the amount of coconut sugar and increase the nutritional yeast. They make for a great savoury biscuit and pair perfectly with gravy, soup or Chilli Con Carne.

30 minutes (makes 13 – 15 small shortcakes)

Ingredients for the cakes

  • 2/3 cup potato starch
  • 1 ½ cups almond flour
  • 1 tbsp tapioca flour
  • Pinch of sea salt
  • 2 tsp baking powder
  • 2 tbsp coconut sugar
  • 2 tsp nutritional yeast
  • 4 tbsp butter
  • ¼ cup of coconut milk
  • 2 eggs


Components for toppings

  • 200ml double cream (preferably from organic/free-range cows)
  • Strawberries from the Fruitful Day Box

Method

  1. Preheat oven to 180 degrees C.
  2. In a mixing bowl add the dry ingredients; potato starch, almond flour, tapioca flour, salt, baking powder, coconut sugar and nutritional yeast. 
  3. Whisk the eggs separately, set 1 tbsp aside, then stir into the mixture.
  4. Add the butter and start bringing the mixture together into a dough with your hands. Add the coconut milk slowly until the mixture comes along – you might not need all of it.
  5. Flour a surface with potato starch and handling the dough as little as possible, roll out until it’s about 1 inch high.
  6. Using a cookie cutter or bench scraper, cut the biscuits into circles or squares and then arrange on a baking sheet lined with baking paper.
  7. Brush the tops with the egg wash set aside and then bake for 15 – 20 minutes. Remove from the oven and let rest.

Arrangement for the toppings

  1. Pour cream into a bowl and whisk with a hand whisk or handheld beater until it forms a whipped cream consistency that can be spooned or piped onto the shortcakes.
  2. Wash strawberries, remove stalks and slice into four slices. You can leave some the larger pieces for the top of the scone.
  3. Cut the shortcakes in half, spread or pipe cream onto the bottom half, add strawberries, cover with the top half and repeat.


Dates stuffed with sunbutter

First and most importantly, Ramadan Kareem from the Fruitful Day team! It’s always a magical time of year to spend with family and friends, but it’s equally important to keep health in mind during the Holy Month. Fasting or not, it is easy to get dehydrated with the temperatures steadily on the rise. Make sure to hydrate as much as you can at night and think about foods that will keep you full for longer.  

Amongst the foods that will keep you fuller for longer are foods high in protein.  Peanut butter is of course one of the more well-known high protein foods, but many kids and adults aren’t able to eat it because it contains nuts. For this reason, sunflower seed butter is actually a great substitute!

Sunflower seed butter is full of healthy fats, vitamin E, and magnesium, which has the added benefit of helping you with your digestion.  

Today’s recipe is a super simple snack, dates stuffed with sunbutter! In addition to the sunbutter, dates are good source of vitamins and minerals. Perfect for breaking your fast and getting you on your way to a healthy Ramadan!

Dates stuffed with sunbutter (sunflower seed butter)

20 minutes (depending how many dates you want to do)  

Ingredients

  • Dates
  • Sunflower seed butter

METHOD for the biscuit

1. Cut each date open with a sharp knife, however, don’t cut it all the way through the date.

2. With a small teaspoon, spoon out a small amount of sunflower seed butter and put it into the space where the seed was.

3. Close the date and consume immediately or leave to set in the fridge.

Avocado Chocolate Mousse

Last week we introduced you to the newest addition of the Fruitful Day family, a fruit bouquet! It’s made with strawberries, raspberries, blackberries, physalis, and a touch of mint.

We wouldn’t want you to go without a new recipe for your Valentine too though!  This week we are sharing a recipe for an avocado chocolate mousse, which is a little different than your typical mousse as it uses melted chocolate achieving an extra creamy texture.

Whether you’re single, taken, or just plain hungry, we’re sure you’re going to love this dessert!  Wishing you a happy, healthy Valentines Day from the whole Fruitful Day family. 

Avocado Chocolate Mousse (serves 2/3 for dessert)  

30 minutes

Ingredients

  • 100g dark chocolate (you can use 70% cacao)
  • 1 tsp vanilla essence
  • 100g coconut cream (to make this – put the tin of coconut cream in the fridge overnight. In the morning, scoop only the cream off the top leaving the water behind. Set aside).
  • 1 avocado from the Fruitful Day Box
  • ½ tbsp honey (optional)
  • 50g full fat yoghurt or coconut yoghurt

METHOD

1. Place a glass bowl over a saucepan of simmering water. Chop the chocolate into small pieces and place into the bowl to melt.

2.  In a separate bowl, smash the avocado with a fork.

3. Place the coconut cream in a bowl and beat with a hand beater until it forms soft peaks.

4. Add the chocolate, vanilla, yoghurt, honey to the avocado and blend with a hand blender.

5. Add the whipped coconut cream and blend (leave a few tablespoons aside for garnish)

6. Garnish with coconut cream and grated dark chocolate.

Chocolate Orange Tart

It’s Christmas Eve and what better way to celebrate than with a chocolate orange tart!  This tart is rich, creamy and indiscernibly healthy. How you wonder? If you use coconut cream and a refined sugar-free dark chocolate it is gluten, dairy and refined sugar free, which seems surprising for how decadent it is. Even if you use full cream and 85% Lindt chocolate, it’s still a gluten free dessert with minimal added sugar! 

This makes our Chocolate Orange Tart the perfect to please both the health conscious and the more indulgent festive eaters. With that, we wish those celebrating a Merry Christmas and a Happy New Year!  

We are so grateful for your loyal support through out 2018. We wouldn’t have been able to make it this far with out our most important ingredient – you our customer. Your continued support has allowed us to grow the team and get more creative in the process. We hope to continue to deliver the freshest, tastiest hand picked fruits to you and to continue to brighten up your days.

Chocolate Orange Tart (makes one 21cm tart)  

1 hour 15 mins

Ingredients for the crust

  • 120g gluten free flour
  • 120g buckwheat flour
  • 2 free range eggs
  • 100g butter
  • 100g coconut sugar
  • Zest of one orange from the Fruitful Day Box
  • 1 tea spoon cinnamon
  • ¼ tsp salt

Ingredients for the filling

  • 1 ¼ cups full cream or coconut cream
  • 2 tea spoon orange zest from the Fruitful Day Oranges
  • 300g dark chocolate (I used 85%)
  • 2 eggs
  • Pinch of salt

METHOD for the crust

  1. Remove butter from the fridge to soften and preheat the oven to 180 degrees C.
  2. Add all dry crust ingredients to a mixing bowl; gluten free flour, buckwheat flour, coconut sugar, zest, cinnamon & salt and sift together.
  3. Chop butter into cubes and whisk eggs in a separate bowl.
  4. Put cubed butter and eggs into the bowl with the dry ingredients and bring together as a dough in your hands.
  5. Wrap dough in the cling film and allow to harden in the fridge for one hour.
  6. Grease a 21cm tart tin or silicon mould with ghee or coconut oil.
  7. Once the dough is set, remove from the fridge and place onto a clean, dry floured surface.
  8. With a rolling pin, roll the dough into a flat circular shape. You may not be able to roll it very thinly as gluten-free crusts are much harder to work with.
  9. Once in the mould, you can press with your fingers to even it out across the bottom and up the sides. Then prick the crust with a fork all over.
  10. Cut out a circle of baking paper approximately 30 cm in diameter.
  11. Place this over your pie crust and pour some rice or beans into the centre to hold the paper down – this is called ‘blind baking’ – it allows the crust to bake evenly on it’s own before putting the filling in. The beans or rice act as weights to hold the baking paper down.
  12. Blind bake for 15 minutes and then set aside while making the filling


METHOD for the filling

  1. Put cream in a heavy bottom saucepan on medium heat and add the zest and salt. Bring to a simmer and stir.
  2. While cream is heating, finely chop 230g chocolate and place in a wide bottomed bowl.
  3. Pour 90% of the cream onto the chocolate and let it sit for 3 – 5 minutes. This allows the cream to melt the chocolate.
  4. Pour the remaining cream into a bowl with the eggs and whisk quickly. This tempers the egg mixture so the eggs don’t curdle when they come in contact with the hot cream.
  5. Next, add the egg and cream mixture to the chocolate and cream mixture. Stir with a whisk from the centre outwards until everything in incorporated evenly.
  6. Pour this mixture into the crust and bake for 18 minutes or until the chocolate is set in the centre.
  7. Remove from oven and cool on a rack.
  8. Remove from tart tin and garnish with remaining chocolate and orange zest.


Poached Pears

Sometimes the simplest things, are the best! Pears are a beautiful fruit to enjoy in the winter while they’re ripe and delicious. While traditionally this dish, poached pears, is made with a lot of sugar, this is a healthier alternative that doesn’t compromise on flavor. A few tablespoons of honey, plus the sweetness from the added citrus fruits concentrated down, makes a really amazing tasty syrup. 

This dessert looks really impressive on a plate, but is so simple and easy to do. Don’t forget to cut the bottoms off the pears when you’re preparing a plate, so they can stand up on their own.

If you’re wondering why pears should be part of your diet, they contain high levels of antioxidants, vitamin C, and fiber. That means all sorts of good things like better digestion, guarding against age-related diseases, and having anti-inflammatory effects. Go on and enjoy your dessert!

Poached Pears


1 – 1.5 hours

 Ingredients

  • 1 liter of water
  • 3 pears from the Fruitful Day Box
  • 2 crushed cardamom pods
  • 2 table spoons of honey
  • 1 vanilla pod
  • 2 cinnamon sticks
  • 2 star anise
  • 12 cloves
  • 1 thinly sliced orange from the Fruitful Day Box
  • 2 tea spoons finely chopped fresh ginger
  • 1 table spoon of apple cider vinegar
  • Ice cream/full cream to serve (optional)

METHOD

  1. Peel the pears but leave the stems attached.
  2. Cut out a baking paper circle the same diameter as your saucepan – you can do this by placing the saucepan down on the baking paper and drawing around the base of the saucepan with a pencil.
  3. Place all ingredients in the saucepan and place the baking paper on top. It should float on the surface of the water – this keeps the pears fully submerged while they are poaching.
  4. Bring to a gentle simmer and allow to simmer for 1 hour. After 1 hour check the softness of the pears. If they need more time continue cooking, however, be careful not to overcook or they will be mushy. The amount of time they need depends on the size and ripeness of the pear.
  5. Once the pears are soft, pour the liquid through a strainer into a bowl. Set the pears aside, discard the spices and place the liquid back in the saucepan.
  6. Now on high heat, boil the poaching liquid until it is reduced to around 2 table spoons. At this point it will be viscous and syrupy.
  7. Place the pears in a bowl and pour the syrup over. Add ice cream or cream as the combination of the hot pears and cold ice cream is great!

Raw Brownies

We’re almost to the end of the 7 recipes in 7 days! If you’ve enjoyed these recipes, we’d love you to share them on social media and tag us at @fruitfuldayuae on Instagram and @fruitfulday on Facebook.

Our second to last recipe is for raw brownies, which essentially means they don’t need to be baked and thus are very quick and easy to make!

In an earlier blog post, we discussed the difference between cacao and cocoa. In case you missed it, check it out here in our mint cacao bliss balls recipe.  In short, if you can, choose cacao over cocoa because it is made by cold-pressing un-roasted beans meaning all the enzymes are left tact and we can enjoy all the health benefits.

Raw Brownies (makes one 20cm x 14cm brownie sheet – can be cut into any size) 

Raw Brownies

30 minutes

INGREDIENTS for the brownie

  • 1 ½ cups mixed nuts and seeds from the Fruitful Day box: sunflower seeds, cashews, pecans, pumpkin seeds
  • ¾ cup fresh grated coconut (or substitute for dry desiccated coconut)
  • ¾ cup cacao powder
  • 1 ½ cups dates from the Fruitful Day box
  • 1 tbsp peanut butter
  • 1 tbsp coconut butter
  • 1 tbsp coconut oil
  • ¼ tsp salt

INGREDIENTS for the ganache 

  • 200g dark chocolate
  • 200g coconut cream

Raw Brownies

METHOD for the brownie

  1. Add all dry ingredients to a food processor; nuts, seeds, cacao powder and salt and pulse until broken down into small pieces.
  2. Add wet ingredients; dates, grated coconut, peanut butter, coconut butter and coconut oil. Process until the ingredients come together as a dough.
  3. Line a rectangular baking tray with cling film.
  4. Press the brownie dough into the tray and flatten until it’s a brownie sheet about 2cm thick.

* Note – if you substitute fresh grated coconut with desiccated coconut, the dough may be quite dry. If this is the case, add more peanut butter, coconut butter or coconut oil. The dryness of both the coconut and the dates will determine whether to add more wet ingredients. The dough should come together and hold together easily.

METHOD for the ganache 

  1. Cut chocolate up into little pieces and place in a large bowl.
  2. Place coconut cream in a saucepan on medium heat and allow to reach a gentle simmer – do not boil.
  3. Pour coconut cream over the chocolate and let it sit for 5 minutes until all the chocolate is melted.
  4. With a whisk, stir the mixture until the chocolate and cream are combined. Allow to set in the fridge for 10 – 15 minutes or until it’s of a spreadable consistency.
  5. With a spatula, spread the ganache over the chocolate brownie and garnish with some sea salt or cacao nibs.

Apricot Muffin

If your kids are anything like ours, they’re always asking for muffins, but it’s not easy choosing a healthy recipe that they’ll still like.

Today’s apricot muffins are made with almond and coconut flour making them far more nutritious, but without compromising on taste. Win for mom and dad, win for the kids!

Instead of muffins, you could also bake this as a sweet loaf and enjoy with butter and jam in the morning.  Either way, we’re sure you’re going to love it!

Apricot Muffins  

(makes 9 small muffins)  

Apricot Muffin

45 minutes (including baking time)

INGREDIENTS for the muffins 

  • ½ cup ghee
  • 2 ¼ cups almond flour
  • ½ cup coconut sugar
  • ½ tsp baking soda
  • ¼ tsp salt
  • 2 large eggs 1 tsp vanilla extract
  • 4 apricots from the Fruitful Day box.

METHOD 

Apricot Muffin

  1. Preheat over to 180 degrees C.
  2. Melt ghee in a saucepan or in the microwave and set aside.
  3. Slice or chop apricots and set aside.
  4. In one bowl, whisk together the dry ingredients; almond flour, coconut sugar, baking soda and salt.
  5. In another bowl, mix wet ingredients; melted ghee, eggs and vanilla.
  6. Add the mixtures together along with the sliced apricot and combine until a dough forms.
  7. Grease or line your muffin tray.
  8. Bake for 22 – 25 minutes or until a toothpick inserted comes out clean.

Nut Butter Cups

It’s the weekend so little indulgences are definitely allowed.  Afterall, life is about balance.

Today’s recipe is for homemade nut butter cups. Step aside Reese’s peanut butter cups, we have a healthier version for you! By making it yourself, it will leave you more satiated as you can add in healthy fats such as coconut oil and peanut butter.  Instead of 5 nut butter cups, you’ll only feel the need to grab 1 of these babies!

This recipe is quite easy to make and if you’e short on time you can even buy pre-bought nut butter to cut the time down to 15-20 minutes.

If you want to make it vegan, simple replace the honey with maple syrup.

We hope you’re enjoying our week of recipes. As always, we’re here to make a healthy lifestyle easier and more accessible to all.

Nut Butter Cups (makes 12 nut butter cups) 

Nut Butter Cups

1 hour (including setting time)  

INGREDIENTS for the nut butter 

  • 1 cup mixed nuts from the Fruitful Day Box.
  • ¼ tsp salt
  • 1 tbsp coconut oil

INGREDIENTS for the chocolate 

  • ½ cup coconut oil
  • 3 tbsp cacao butter
  • ¾ cup raw cacao powder
  • ¼ cup honey / maple syrup (or less if you prefer it to be less sweet)
  • ¼ tsp salt

Nut Butter Cups

METHOD for the nut butter

  1. Preheat oven to 160 degrees C.
  2. Place nuts on a baking tray and roast for 6 – 8 minutes or until browned.
  3. While still hot, place nuts in a high speed blender with the coconut oil and salt. Depending on how powerful your blender is, you may need to add coconut oil to help the blades spin.
  4. Place in the fridge to harden while you make the chocolate.

METHOD for the chocolate

  1. Place the coconut oil and cacao butter in a bain-maire (a glass bowl over a pot of simmering water) and stir until melted.
  2. Add honey/maple syrup and stir.
  3. Remove from the heat and add cacao powder and salt. Stir until combined.
  4. Line a cupcake or muffin tray with paper baking cups.
  5. Pour approximately 2 tbsp of chocolate mixture into the base of the paper baking cup and place in the fridge to set. This should take 10 – 15 minutes.
  6. Once set, spoon 1 – 2 tsp nut butter on the set chocolate base. If the nut butter is too runny it will run to the edges rather than sitting in the centre.
  7. Pour the melted chocolate mixture over the peanut butter until it’s totally covered.
  8. Return to the fridge to set. This should take 15 – 20 minutes. Once set, the paper should peel off very easily.

Raw Vegan Lime & Cherry Tart

We promised you 7 recipes in 7 days and we think you’ll love this 2nd one!  Desserts are a weak spot for many of us, but they don’t have to be a guilty indulgence. If you plan ahead, you can actually fill your desserts with whole foods that will enrich you in some way.

Our Raw Vegan Lime & Cherry Tart is inspired by LA’s well-known vegan Cafe Gratitude.  What makes it different than a typical vegan cheesecake is that the crust is made primarly with fresh grated coconut rather than nuts.  There are also NO filler ingredients like potato starch, thickeners like guar gum or alcohol sweeteners that are hard on your stomach.

In case you missed our first recipe in the series, click here to learn how to make apricot and orange granola bars.

Raw Vegan Lime & Cherry Tart (makes one small 12cm tart – you can double the recipe to make a large tart) 

30 minutes (not including chilling time)

Raw Vegan Lime & Cherry Tart

INGREDIENTS for the crust 

  • 3/4 cups of soaked cashews (soaked overnight or for at least 4 hours) from the Fruitful Day Box
  • ½ cup desiccated coconut
  • ¼ cup macadamia nuts
  • 28g dates from the Fruitful Day Box
  • ½ tsp vanilla extract
  • Pinch of salt

INGREDIENTS for the filling 

  • 3/4 cups of soaked cashews (soaked overnight or for at least 4 hours) from the Fruitful Day
  • ¼ cup fresh shredded coconut
  • Juice of 3 limes from the Fruitful Day Box
  • ¼ cup of maple syrup
  • 1/8 tsp turmeric
  • 1/8 cup coconut milk
  • 1 ½ tsp vanilla extract
  • 1/8 tsp salt
  • 7 tbsp melted coconut oil
  • 1 tbsp melted cacao butter
  • Two handfuls of cherries from the Fruitful Day Box

Raw Vegan Lime & Cherry Tart

METHOD for the crust 

  1. Process all ingredients except the dates in a food processor.
  2. Add dates and process until the mixture comes together to form a dough.
  3. Line your tart dish with cling film or grease with coconut oil.
  4. Press crust into the base of the dish until it forms an even curst that rises up the edges by about 2cm.
  5. Leave to set in the fridge.

Method for the filling

  1. Blend all ingredients in a high speed blender until they are smooth. You may need to add more coconut oil or cacao butter depending on how strong your blender is.
  2. Pour the filling into the pie crust.
  3. Remove stems from cherries, slice in half and pit.
  4. Use these cherries as a garnish on top of the tart.
  5. Set in the freezer for – 2 hours.